
Inside the FRP Grating Manufacturing Process: From Raw Materials to Finished Product
Understanding how FRP (Fiberglass Reinforced Plastic) grating is manufactured provides valuable insight into why this material delivers such exceptional performance. Two distinct manufacturing processes — molding and pultrusion — produce grating products with different characteristics suited to different applications. This guide walks through each step of both processes, from raw material selection to final quality inspection.
Raw Materials: The Foundation of Quality
Glass Fiber Reinforcement
The structural backbone of all FRP grating is continuous glass fiber. The type, orientation, and quantity of glass fiber determine the product’s mechanical properties.
- E-Glass (Electrical Glass): The industry standard — excellent strength, good chemical resistance, cost-effective. Used in 90%+ of FRP grating production.
- E-CR Glass (Corrosion-Resistant): Enhanced acid resistance compared to standard E-glass. Specified for highly acidic environments.
- Fiber forms: Continuous rovings (bundles of untwisted filaments), continuous strand mat (randomly oriented chopped fibers), woven fabrics
- Fiber content: Typically 30–40% by weight for molded grating, 60–70% for pultruded grating
Resin Matrix
The resin binds the glass fibers together, transfers load between fibers, and provides the chemical and environmental resistance. The three primary resin families are:
- Isophthalic Polyester: Standard grade — good overall properties, cost-effective
- Vinyl Ester: Premium grade — superior chemical resistance and toughness
- Phenolic: Fire-specialist grade — lowest smoke and flame spread
Additives and Fillers
- UV inhibitors: Protect against sunlight degradation in outdoor applications
- Pigments: Integral color throughout the product (not surface paint)
- Flame retardants: Enhance fire performance (particularly for polyester and vinyl ester)
- Low-profile additives: Reduce shrinkage during curing, improving dimensional accuracy
- Catalyst (initiator): MEKP (methyl ethyl ketone peroxide) triggers the curing reaction
- Alumina trihydrate (ATH): Smoke suppressant filler, especially important for fire-rated products
Surface Veil
A thin synthetic polyester veil (typically Nexus veil or similar) is applied to the outer surface to:
– Create a resin-rich surface layer for enhanced corrosion resistance
– Prevent glass fiber “bloom” (fibers exposed at the surface)
– Improve UV resistance
– Provide a smooth, aesthetically consistent finish
Manufacturing Process 1: Molded FRP Grating
Molded grating is the most common type, accounting for approximately 70% of global FRP grating production. The process creates a one-piece panel with bi-directional strength.
Step 1: Mold Preparation
A precision-machined steel mold determines the final grid pattern and dimensions. The mold cavity consists of intersecting channels that form the bearing bars and cross bars of the finished grating. Before each production cycle:
- The mold is thoroughly cleaned of any residual material from the previous cycle
- A release agent is applied to all mold surfaces to prevent the cured grating from sticking
- The mold is inspected for any damage or wear that could affect product quality
Step 2: Gel Coat Application (Optional)
For applications requiring a specific color finish or additional chemical protection, a pigmented gel coat (a resin-rich layer) is applied to the mold surface before laying the glass fiber. This becomes the top surface of the finished grating panel, providing the first line of defense against the operating environment.
Step 3: Glass Fiber Placement
Continuous glass fiber rovings are laid into the mold channels, filling them completely in alternating directions. This cross-laying of fibers is what gives molded grating its characteristic bi-directional strength. Operators carefully control the quantity and distribution of glass in each channel to achieve the specified mechanical properties. This is a manual or semi-automated process requiring skilled technicians.
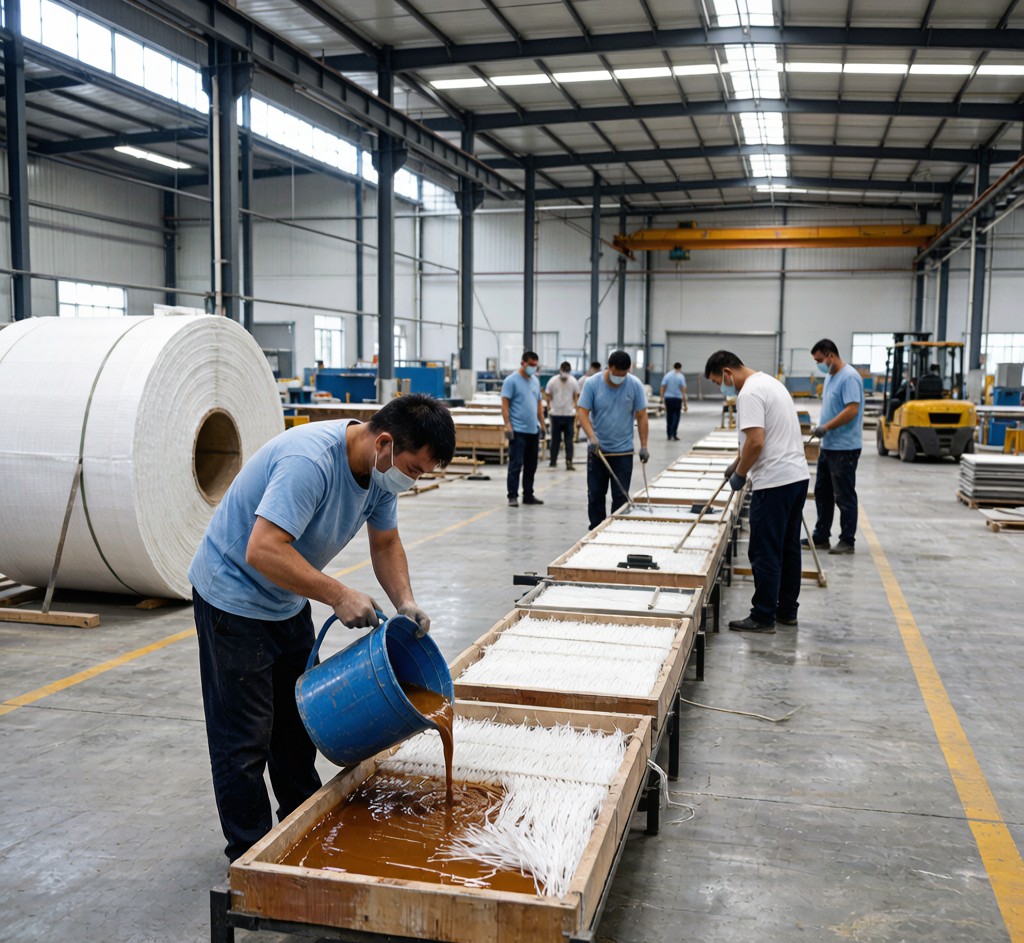
Step 4: Resin Impregnation
Once the glass fibers are in position, catalyzed liquid resin is poured over the entire mold. Technicians use rollers and squeegees to work the resin into the fiber, ensuring complete wet-out — every glass filament must be fully coated with resin. Incomplete wet-out creates dry spots that become structural weak points. The resin fills all voids and bonds all intersecting fibers into a monolithic structure.
Step 5: Curing
The filled mold is placed in a controlled environment for curing. The catalyst (MEKP) initiates an exothermic chemical reaction that transforms the liquid resin into a solid thermoset polymer matrix. Key curing parameters:
- Temperature: Typically 25–35°C (room temperature cure, though elevated temperature accelerates the process)
- Duration: 1–4 hours for initial cure; full mechanical properties develop over 24–48 hours
- Gel time: 15–45 minutes — the point at which the resin transitions from liquid to gel state
- Peak exotherm: Monitored to ensure it does not exceed the resin’s design limit (typically 150–180°C internally)
Step 6: Demolding and Trimming
After sufficient curing, the solid grating panel is lifted from the mold. Flash (excess material at edges) is trimmed using diamond-tipped saws. Openings are fabricated where required for pipe penetrations, columns, or equipment access. The panel dimensions are verified against specifications.
Step 7: Surface Treatment
The walking surface receives its final treatment based on the specified surface type:
- Grit-top: Quartz or aluminum oxide grit is bonded to the surface with additional resin
- Concave: The naturally formed meniscus surface resulting from the molding process is retained
- Covered: A solid FRP plate is bonded to the top surface
Step 8: Post-Cure (Optional)
For critical applications requiring maximum chemical resistance and mechanical properties, panels may undergo a post-cure cycle in an oven at 60–80°C for 2–4 hours. This completes the cross-linking reaction, enhancing the glass transition temperature (Tg) and chemical resistance.
Manufacturing Process 2: Pultruded FRP Grating
Pultrusion is a continuous manufacturing process that produces individual bearing bars with very high unidirectional fiber content. These bars are then fabricated into grating panels.
Step 1: Fiber Rack and Guide System
Hundreds of glass fiber rovings are pulled from creels (fiber spools on a rack) through a guide plate that positions each roving precisely for its role in the final profile. The guide plate ensures that fibers are distributed correctly — surface mats for the exterior, continuous rovings for the core, and any special reinforcements (carbon fiber, aramid) in specific locations.
Step 2: Resin Impregnation Bath
The arranged fiber bundle is pulled through an open resin bath containing catalyzed liquid resin. As the fibers pass through, they are thoroughly saturated with resin. Guide bars and rollers within the bath help work the resin between all fiber layers. The residence time in the bath determines the degree of wet-out achieved.
Step 3: Pre-Forming Guide
After the resin bath, the wet fiber bundle passes through a series of pre-forming guides that progressively shape it toward the final profile (I-bar, T-bar, etc.) while squeezing out excess resin and trapped air. This staged forming prevents fiber damage and ensures uniform resin distribution.
Step 4: Heated Die Curing
The pre-formed, resin-saturated fiber bundle enters a heated steel die — the heart of the pultrusion process. The die is precisely machined to the final cross-sectional shape of the bearing bar and is typically divided into heating zones:
- Zone 1 (Heat-up): Raises the material temperature near the curing threshold
- Zone 2 (Gel): Initiates the curing reaction; the resin transitions to a gel
- Zone 3 (Cure): Completes the polymerization at 140–180°C
- Die length: Typically 0.6m to 1.2m (2–4 feet)
- Line speed: 0.3–1.5 meters per minute, depending on profile size and resin system
The die’s internal profile determines the exact shape of the finished bearing bar, including any grooves, ribs, or surface features.
Step 5: Pulling System
A reciprocating or caterpillar-type puller grips the cured profile exiting the die and continuously pulls the entire line forward. The pulling force must be precisely controlled — too much force can break fibers; too little results in inconsistent line speed and product variation.
Step 6: Cut-to-Length
The continuous cured profile emerging from the puller is cut to the required bearing bar length using a diamond-tipped flying cut-off saw that travels with the moving bar during cutting. Typical bar lengths range from 1m to 12m.
Step 7: Grating Assembly
Individual pultruded bearing bars are assembled into grating panels in a fabrication jig. Cross rods (also pultruded) are inserted through pre-drilled or pre-notched holes in each bearing bar at the specified spacing (typically 100mm or 150mm on center). The cross rods are locked in place using epoxy adhesive or mechanical fasteners to create a rigid, integrated panel. This assembly process allows for custom bar spacing and panel dimensions not possible with molded grating.
Quality Control and Testing
Throughout both manufacturing processes, rigorous quality control ensures every panel meets specification:
In-Process Inspections
- Resin gel time testing: Verifies the catalyst ratio and resin reactivity before each production run
- Glass content verification: Burn-off testing (ASTM D2584) to confirm fiber content by weight
- Barcol hardness: Surface hardness measurement (ASTM D2583) to verify complete cure
- Visual inspection: Every panel examined for dry spots, cracks, voids, delamination, or surface defects
- Dimensional check: Grid openings, panel thickness, and overall dimensions measured against tolerance tables
Finished Product Testing
- Load testing: Panels tested to verify load-deflection behavior matches design calculations (typically to 2× design load)
- Chemical resistance: Coupon samples immersed in specified chemicals, with mechanical property retention measured after immersion periods
- Fire testing: ASTM E-84 (surface burning), ASTM E-662 (smoke density), IMO FTP Code Parts 2 and 5 for marine products
- Slip resistance: Coefficient of friction testing (typically per ASTM or DIN standards)
- UV weathering: Accelerated weathering (QUV/Xenon arc) to verify long-term outdoor performance
Industry Standards and Certifications
- ASTM E-84: Standard test method for surface burning characteristics of building materials
- ASTM D635: Rate of burning and extent of burning of plastics
- ASTM D2583 / D2584: Barcol hardness and glass content verification
- ISO 14125 / ASTM D790: Flexural properties of FRP composites
- IMO FTP Code: International Maritime Organization Fire Test Procedures
- OSHA 1910.22 / 1910.23: Walking-working surfaces standard
- EN 124: Gully tops and manhole tops for vehicular and pedestrian areas (European)
- USCG Approval: United States Coast Guard certification for marine applications
Environmental and Safety Considerations in Manufacturing
- Styrene emissions control: Resin mixing and molding areas equipped with ventilation systems to capture styrene vapor. Many facilities use low-styrene or styrene-suppressed resin formulations.
- Waste minimization: Trim waste and off-spec panels are ground and used as filler in non-critical products where appropriate.
- Worker safety: Full PPE (respirators, gloves, eye protection) required in resin handling areas. Continuous air monitoring for styrene and VOC levels.
- Solvent recovery: Cleaning solvents used for tool and equipment maintenance are captured and distilled for reuse where possible.
Why Manufacturing Process Matters to the End User
The manufacturing process directly determines the performance characteristics you receive:
- Molded grating = uniform properties in all directions — best for general industrial flooring
- Pultruded grating = maximum strength in the span direction — best for long spans and heavy loads
- Phenolic grating = specialized fire-safe manufacturing — required for offshore and mass transit
- Quality-controlled manufacturing = predictable, certifiable performance — essential for safety-critical applications
For detailed product specifications, technical data sheets, or to discuss your specific manufacturing requirements, contact our engineering and production team.